The Cloud Resume Challenge - AWS Version
Building a serverless static website on AWS with CI/CD pipelines (GitHub Actions)

Technical Consultant
I discovered the #CloudResumeChallenge while aimlessly scrolling through the internet, and thought it would be fun to spend some time completing it.
Before taking the challenge, it is recommended that participants have at least the AWS Cloud Practitioner Certification. Additional rules are as follows:
- Resume must be written in HTML and styled with CSS
- Traffic should be served via CloudFront from the S3 bucket
- Website must have a JavaScript visitor counter to keep track of site visitors
- The site should only communicate with the backend via API Gateway
- Infrastructure as Code
- Implement a pipeline to automate future deployments using GitHub Actions
This article will cover the steps I took to complete this challenge as well as some of the useful resources I found along the way.
1. Certification
I was certified by AWS twice over before I came across this challenge, so I skipped this step. Out of all the cloud-related resources I've come across, I found that courses from Neal Davis and Adrian Cantrill were extremely helpful in preparing for my examinations. Neal and Adrian are both very knowledgeable in their field, and their affordable prices makes their content accessible to everyone who needs it! Adrian even offers lifetime access to his courses - talk about a great deal!
There is no better way to prepare for your AWS Certification exams than with practice exams from Jon Bonso.
2. HTML/CSS
This was my first time encountering HTML/CSS. I knew it existed in browsers but never thought to investigate it further. However, after spending a few days learning the basics, I designed my resume using HTML. Even though I was proud of the work, something wasn't quite satisfactory about the final product. Since becoming an expert at HTML/CSS wasn't important to me, I went with a free template from Angry Studio instead.
3. Static Website
After obtaining the HTML template and tweaking it to my taste, it was time to create my website! I used this guide from AWS which provided simple step by step instructions that I followed exactly as stated in order to create my new website with ease!
Because I wanted my visitors to be able to find my site using either the root domain or subdomain (abc.com or www.abc.com, respectively), I created 2 buckets and set up website redirect on the root domain bucket.
4. HTTPS
For security, the resume website is required to use HTTPS. A public certificate is required to configure CloudFront to require that viewers use HTTPS.
I utilized AWS Certificate Manager (ACM) to request my public certificate per the instructions in this guide from AWS. However, before I could finish this step, I had to jump ahead to point #5 and link my domain with Route 53.
5. DNS
Route 53 wasn't my primary DNS provider, so I had to take an extra step. Even though it's possible to use AWS services with a third-party DNS provider, everything being under the same company made things easier for me.
The extra step involved creating a publicly hosted zone in Route 53 for my custom domain purchased on GoDaddy. Once hosted zone was created, I updated the name servers in GoDaddy. Updating the name server will allow Route 53 to serve traffic instead of GoDaddy. This video helped me navigate through this challenge.
Alias records let you route traffic to selected AWS resources, such as CloudFront distributions and Amazon S3 buckets. They also let you route traffic from one record in a hosted zone to another record.
Lastly, I created 2 Alias Records in my public hosted zone to route traffic to my CloudFront distributions.
6. JavaScript
Before starting this challenge, I had no experience with JavaScript. However, my earlier experience with Python proved to be very helpful. I already knew how to write and call functions in Python, so all that was left was to understand the syntax of JavaScript.
I spent some time learning the syntax and this minicourse from Codecademy was extremely helpful.
async function getCount() {
    const response = await fetch(api_url);
    const data = await response.json();
    .....
    .....
}
By watching videos and doing exercises, I was able to learn enough to write a function (shown above) that makes an API call. Tested my function using Kanye Rest API.
7. Database (DynamoDB)
The website visitor counter needs to store the count somewhere, and I chose Amazon's DynamoDB for this. You could use RDS (Relational Database Service), but that would be more expensive and a little excessive in my opinion.
I had no trouble creating a DynamoDB table for my site, thanks to Adrian's course.
8. Lambda
I have created a database table, but how do I change its content without using the point-and-click interface? If you're thinking Lambda, you guessed right!
I used the boto3 library for AWS to create a function that interacts with my database. I used a single function to update and return the visitor count. While I could have created two functions (one to update count and another to retrieve count), I'm happy with just one.
9. API
This was the most difficult part of the challenge for me. I read many blogs and watched countless YouTube videos on APIs. The Be A Better Dev YouTube channel is an excellent place to go for tutorials with just about everything DevOps related. After conducting thorough research, I discovered that I needed to build a RESTful API.
After many attempts, I finally built a successful REST API. My simple API accepts requests from my JavaScript code and communicates with DynamoDB to update the visitor count and return a value that should be displayed on the site. This operation is supposed to happen every time my site is visited. To test my API during the building phase, I used the Postman platform - it was extremely helpful. If you are doing any sort of work with APIs, this tool is invaluable.
Getting the count to appear on my site was equally as challenging as building the API. You will need a fundamental understanding of CORS to make this occur. Fortunately, I've found a great resource that explains everything you need to know about CORS headers.
10. Tests
I created a test using Python's unitest module to verify that my code was working as anticipated. I completed all of this using PyCharm and AWS CLI on my local machine.
11. Infrastructure as Code
Infrastructure as Code (IaC) automates the management and provisioning of infrastructure through code, which is far more efficient than manual processes. Up to this point, every resource has been manually provisioned by clicking around in various console menus. This system is very time-consuming and often results in human error.
There are a lot of tools that come under the Infrastructure as Code (IaC) category, but I prefer to use Terraform. The reasons I like Terraform more than the other options are:
- I was already familiar with Terraform from previous projects
- Terraform is cloud-agnostic
- The
terraform importcommand allows you to take resources created outside of Terraform and bring them under its management. This means less code for you to write overall.
If you are new to Terraform, I recommend not using the import feature if you are unsure of what you are doing. This is because importing all attributes - including ones that are only known after a resource is created - can lead to more time spent trying to debug your code.
Within a few days, my project was all coded up. I optionally decided to configure an S3 backend to store my Terraform state files since I did not like the idea of my state file being local. If you are looking to get started with Terraform, Zeal Vora has an excellent course on Udemy.
12. CI/CD (Back end)
I needed to set up a pipeline for automated future deployments, so I created a GitHub repository and used GitHub Actions to automate my deployment process.
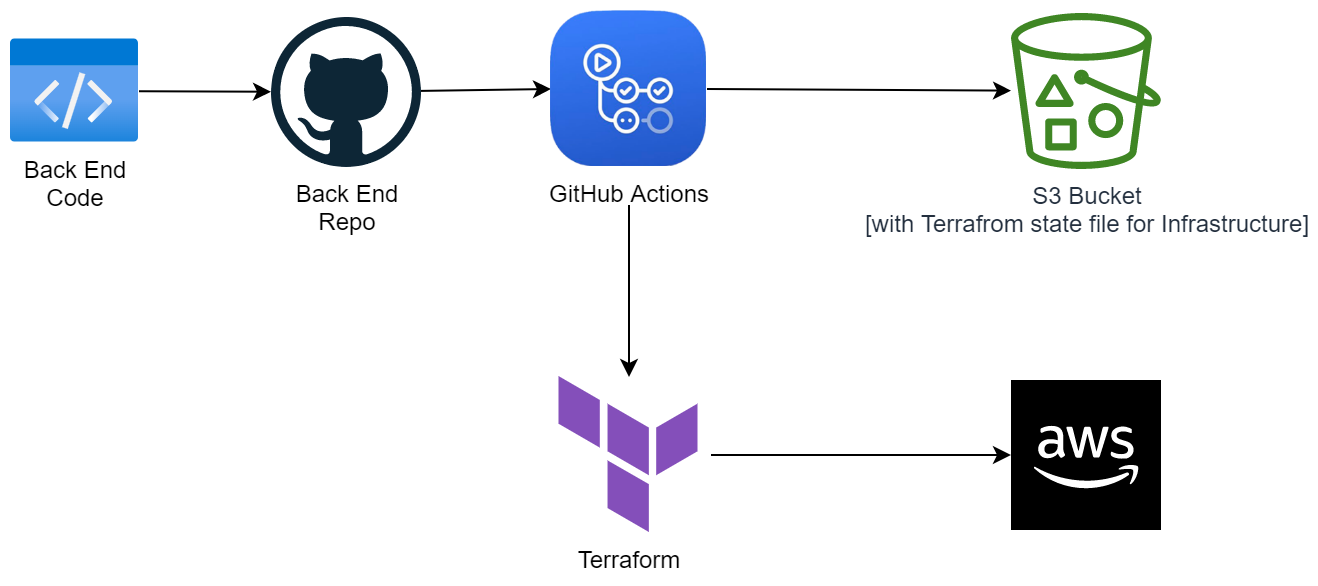
I used OpenID Connect (OIDC) to give GitHub Actions and Terraform the necessary permissions to deploy resources in my AWS account for my backend. OIDC uses trust relationships between my AWS account and GitHub, rather than hardcoded credentials, allowing the latter to assume a role to perform actions. Using IAM security best practices, I granted the role only the permissions it needed to deploy my website.
Upon packaging up my code, I push it to the backend repository. In response to any push event, GitHub actions invoke Terraform and deploy resources to my Amazon Web Services account while updating the state file in the backend S3 bucket in tandem. In the case of failures, the resource will not be deployed and I will be notified.
13. CI/CD (Front end)
I created a new repository specifically for my front end code. Then, I set up GitHub Actions to automate my deployments.
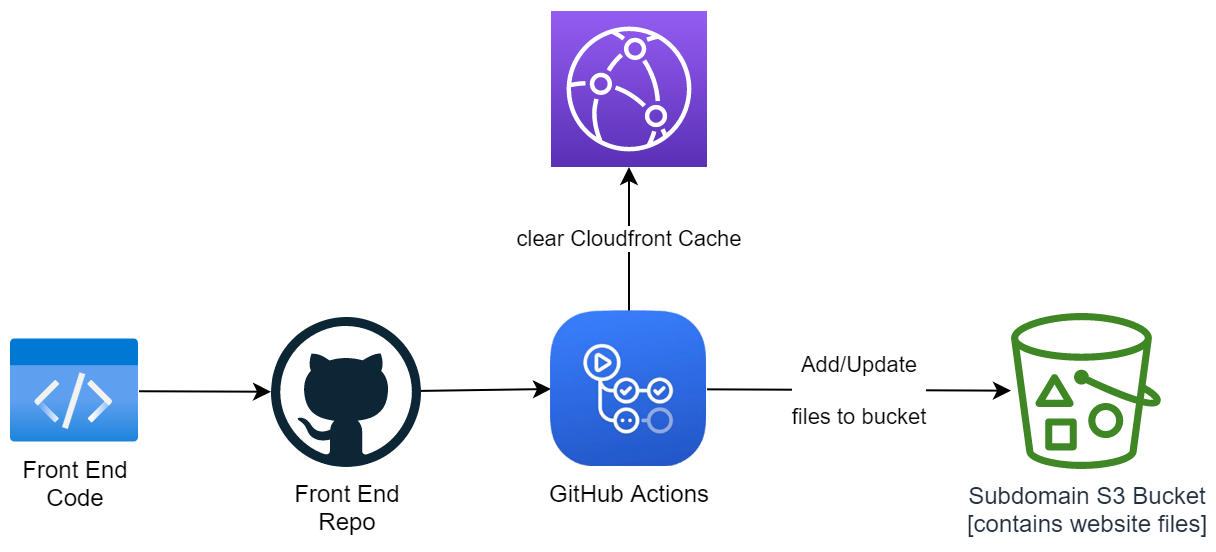
Whenever I make code changes and push them to the repository, GitHub actions are automatically initiated. This clears my current distribution's cache while also syncing my repository with the front-end S3 bucket.
Final Thoughts
This challenge allowed me to not only sharpen my cloud skills but also learn brand new ones, and I was surprised by how many services were necessary. I enjoyed the IaC section the most!
Aside from Python code testing, I am considering incorporating full end-to-end testing using Cypress in the future. This will be integrated with the CI/CD process so that tests are performed every time new code is pushed to the repository instead of just locally on my machine.
Here is the final product. If you're interested in the code, it can be found on my GitHub profile here.

